SCCM OSD log details at Winpe.

SMSPXE.log – PXE Boot log file recorded on server.

1

Once the PXE Boot Done it will come up in WinPE so we can see press F8 .

Wpeinit.log : X:\Windows\System32\wpeinit.log :  it will show you the DNCP details and temporary machine name and other relevant information.

Winpeshl.ini : Notepad.exe X:\Windows\System32\winpeshl.ini : it will show you the customsetting.in it says Task sequence boot shell.

Now we can see the Cmtrace.exe %temp%\SMSTSLog\SMSTS.log file will show you everything till TSBootShell.

Now you can see the Disk partition details.

Now once you will see the apply the Operating system image you can see c drive and file started copying in that particular partition.

To open the unattend.xml file on Win PE

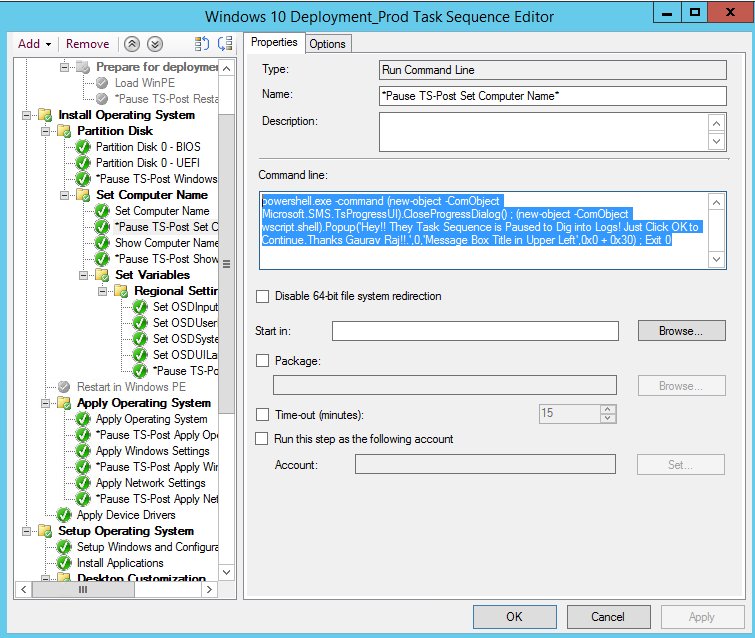
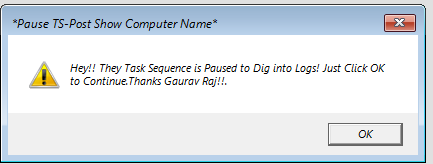
You can put these command line to pause the Task sequence.

If you delete the file DisableCMDRequest.TAG it will allow you to open Command prompt after WinPE Shift+F10

Netsetup.log file give you information about the domain join

SCCM : To fix the upgrade issue from 1802 to 1810 CB

How to troubleshoot while getting issue on upgrade of SCCM CB.

Some times we saw upgrade stuck on Downloading below is the step I mentioned in order to fix this issue.

1)To fix this you can reset the particular package GUID running CMUpdateReset.exe

2) You can start the SQL Management studio and run this query command line and select the all Package GUID together and delete it.

SELECT * FROM CM_CAS.dbo.CM_UpdatePackages
where PackageGuid=’454B3508-4387-4106-9441-283495DEC3EC’ or PackageGuid=’f420d72a-4a0b-40b2-b4d8-275489cc32d0′ or PackageGuid=’6c34f799-8ab9-46e4-a9c6-ff3e84c64829′;

DELETE FROM CM_CAS.dbo.CM_UpdatePackages
where PackageGuid=’454B3508-4387-4106-9441-283495DEC3EC’ or PackageGuid=’f420d72a-4a0b-40b2-b4d8-275489cc32d0′ or PackageGuid=’6c34f799-8ab9-46e4-a9c6-ff3e84c64829′;

3) Restart the SMS_Executive Service and Check the DMPDownloader.log file .

4) Open SCCM Console and see the status. If the issue is Failed to Extract the payload cab of package

You need to check the permission of the Easysetuppayload permission and the network path permission.

I believe this is helpful to fix the upgrade issue on SCCM.

Dell Driver Through Task sequence and DISM command line SCCM 1810


Deploy Precision 3530 Windows 10 Driver Pack from SCCM

In this article we will download the Dell Driver from Online and Make package and Deploy through the Task Sequence.

Download the cab file from Dell Website from Deploy Dell Precision 3530 Windows 10 Driver Pack link below

https://www.dell.com/support/home/uk/en/ukbsdt1/drivers/driversdetails?driverid=r61wv

Now we should extract the cab file and put in Shared network location

Now we will create the package for Dell driver and Distribute the same for DP.

Step 1. Go to Software Library >Click on Software >Package>Create new package

Step 2. Name the application select the Network location and click Next

Step 3. Select Do not create program and click Next.

Step 4 Click Next on the summary and finished.

Step 5. once the package ready we should distribute it to DP and Create the TS Steps for Dell OEM Drivers.

Step 6. ADD the DISM Command line and Select the relevant package and Click on Option on the other tab.

Step 7. On this last step we will set the WMI query for this particular Model and Apply this .

Hope this will help someone to make the driver and apply through Task Sequence.

Dell BIOS Configuration update with SCCM and Dell Command Tool

In this post, We will see how to update BIOS setting for all model Dell laptops.

We will user Dell Command line configuration to extract the required change in the BIOS and we will make a package and then we will make a custom Task sequence to deploy and test the same.

First install the Dell Command Configure tool locally and then select Multi platform package

Screenshot_3

Here we will change two settings for Dell BIOS Configuration

Screenshot_5Screenshot_4

Now Click on Export Config and save it.Screenshot_6

Once you save the new configuration you can see in the Html file also from the saved location.

Screenshot_2

Screenshot_15

Once you save your configuration, navigate to “C:\Program Files (x86)\Dell\Command Configure” and copy the contents of the folder “X86_64” to a location SCCM can access. You will be importing the directory to which you copy these files as a package in SCCM.

Screenshot_1

Now we will make package for BIOS Configuration and Do not create a program and Distribute it after that.

Screenshot_7

Select Do not create Program and Click on Next

Screenshot_8

Now Distribute the BIOS Configuration Package

Screenshot_9

Now we will create the Custom Task sequence and we will add the configuration and Command line there.

Screenshot_10

Add>General Run Command line HAPI\HAPIInstall.bat and select the package.

Screenshot_11

Step 2. Add the Clear BIOS password and attach the package also.

Screenshot_12

Step 3. CCTK BIOS Configuration Dell Model and Add Command line for that and attach package also.

Screenshot_13

Step 4. In the end we will set the BIOS password back to the Dell model .

Screenshot_14

This is the process to Change the BIOS Configuration from Dell Command line and SCCM TS. Hope this will help someone to understand.

SCCM 1806 CB- To Set the Task Sequence Status Message Query.

Task Sequence Status Message query.

Screenshot_7

select stat.*, ins.*, att1.*, stat.Time from SMS_StatusMessage as stat left join SMS_StatMsgInsStrings as ins on stat.RecordID = ins.RecordID left join SMS_StatMsgAttributes as att1 on stat.RecordID = att1.RecordID where stat.Component = “Task Sequence Engine” and stat.Time >= ##PRM:SMS_StatusMessage.Time## order by stat.Time desc

Screenshot_4

select stat.*, ins.*, att1.*, stat.Time from SMS_StatusMessage as stat left join SMS_StatMsgInsStrings as ins on stat.RecordID = ins.RecordID left join SMS_StatMsgAttributes as att1 on stat.RecordID = att1.RecordID where stat.Component = “Task Sequence Engine” and stat.MessageID = “11140” and stat.Time >= ##PRM:SMS_StatusMessage.Time## order by stat.Time desc

Screenshot_5


select stat.*, ins.*, att1.*, stat.Time from SMS_StatusMessage as stat left join SMS_StatMsgInsStrings as ins on stat.RecordID = ins.RecordID left join SMS_StatMsgAttributes as att1 on stat.RecordID = att1.RecordID where stat.Component = “Task Sequence Engine” and stat.MessageID = “11141” and stat.Time >= ##PRM:SMS_StatusMessage.Time## order by stat.Time desc

Screenshot_6

SCCM 1806 CB- Pause Message in the Task Sequence.

Within the Task sequence put the Pause message you can use the below powershell command line in  the task sequence .

powershell.exe -command (new-object -ComObject Microsoft.SMS.TsProgressUI).CloseProgressDialog() ; (new-object -ComObject wscript.shell).Popup(‘Hey!! They Task Sequence is Paused to Dig into Logs! Just Click OK to Continue.Thanks Gaurav Raj!!.’,0,’Message Box Title in Upper Left’,0x0 + 0x30) ; Exit 0

Screenshot_1

Message will display like this on every step in the task sequence.

Screenshot_3


SCCM 2012 Current Branch- Important to Know !!

In this article We will see the Four Important things.

  1. What makes a Site the below Screen showed you the Default Roles that will automatically install while installing the SCCM and The Other is Optional Roles that we can install afterwards also.

Capture3

2) Scalability Limits for SCCM

SCCM Can Support Client

3)What Makes a Central Administration Site and Why we require CAS and Use of CAS.

Capture

4) SCCM Availability Considerations these five component is more important to maintains.

Capture2

SCCM 1806 Hotfix (KB4346645) Upgrade Installation .

In this article We will install the SCCM 1806 Hotfix (KB4346645) on Current branch.

Go to SCCM Console>Administration> Updates and Servicing the release date 24/08/2018

you can check the microsoft link to see the fixes

https://support.microsoft.com/en-us/help/4346645/update-for-system-center-configuration-manager-version-1806-first-wave

Screenshot_1

Select the hotfix and click on Run Prerequisite Check and you can see the status on monitoring

Screenshot_2

Once you done with Prerequisite check . You can click on Install Update Pack and Click Next

Screenshot_5

Click Next with upgrade without Validating.

Screenshot_6

Accept the license and click Next

Screenshot_7

Check Summary and Click Next

Screenshot_8

You will get the successfully install and Close it now.

Screenshot_3

Now you can monitor from monitoring tab.

Screenshot_4

once the installation done you can see the Hotfix installed in updates and Servicing.

Screenshot_9


SCCM 1806-To Create Pre-Staged Content File for Distribution Points.

In this article we will create Pre-staged Content File for another Distribution Points.

Go to SCCM Console and Go to Software Library >Application Management>Application

and select the application which you want to create Pre-staged content file.

Screenshot_12

Click on Browse and Save the file on Network location and Click Next

Screenshot_3

Validate the content and Click Next

Screenshot_4

Once validation done Click Next.

Screenshot_5

Select the Distribution Point that content the file and Click Next

Screenshot_6

See the Summary and Click Next.

Screenshot_7

Successfully Create the Checkpoint.PKGX file . Close it.

Screenshot_8

You will see the PKGX file created on given path. Now we need to login on another Distribution point to extract this file. You can copy this in USB and run there also.

Screenshot_9

once you login on another Distribution point . You can copy the file and run this command locally . It will extract the file and content will be available on your Distribution point afterwards.

Screenshot_11

SCCM 1806- Enable PKI on Configuration manager.

In this article we will enable PKI feature in SCCM

Open Certificate Authority and Create a New Certificate Templates.

Screenshot_1

Right Click and Click on Manage.

Screenshot_2

Right click on Web Server and Click on Duplicate Template

Screenshot_3

Set the template name and Click Apply and OK

Screenshot_4

then Click on Workstation Authentication and Duplicate Template

Screenshot_5

Set the Name SCCM DP Cert and Select Validity Period and then

Screenshot_6

Click on Request Handling and Select Allow Private Key to be exported. Click Apply and OK.

Screenshot_7

Again Duplicate the Workstation Authentication.

Screenshot_5

Name it as SCCM Client Cert and Click Apply and OK.

Screenshot_8

Once you did that you need to enable this GPO Settings and Link this to Client.

Screenshot_14.png

Now open SCCM >Go to Administrators>Site Configuration>Sites> Select Site and Go to Properties.

Under Client Computer Communication Select HTTPS or HTTP and User PKI Client Certificate.

Screenshot_10

In the SCCM Servers and Site System Roles Go to Distribution Point Properties. Enable the HTTPS.

And Import PKI certificate.

Screenshot_11

Enable the Management Point properties HTTPS also.

Screenshot_12

And at the end you can enable the Software update point properties to use 8531 also require SSL Communication to the WSUS Server. Before you enable this setting . We need to set the Require SSL under IIS Manager for WSUS.

Screenshot_13